


I don’t know about you, but the main thing I’m interested in on any new mobile development platform for some reason, is LISTS. I think I’m so fixated on lists is because of the way the iPhone so successfully introduced the paradigm of list based navigation. Everything can be done in a series of lists (ok not really, but they are crucial to many apps!).

Naturally then, the first thing I sought out to do on MonoDroid was to create a list. Easy, piece of cake… If you want to create a boring old list with a single line of text for each item. This is no doubt, an important part of every developer’s Hello World development phase, but it doesn’t take long before you’re craving images, several text elements, and possibly even some checkboxes and/or buttons (easy there tiger). For every ListView in Android, there is a prince charming ListView Adapter to save the day.
The most basic of examples which you’ve no doubt seen involve an ArrayAdapter of some sort, with the default Android.R.Layout.SimpleListItem or whatever it is called. BOOORING. What we need to do to make something exciting is create our own custom ListView Adapter. Now, you could use a SimpleAdapter to map fields to certain resource id’s of a layout, but if you look at a java example of this, ‘Simple’ quickly becomes a relative term. What I like to do is create my own adapter deriving from the BaseAdapter class (how fitting).
Here’s some code for my custom list adapter (explanation to follow):
using System;
using System.Collections.Generic;
using System.Linq;
using System.Text;
using Android.App;
using Android.Content;
using Android.OS;
using Android.Runtime;
using Android.Views;
using Android.Widget;
using Android.Graphics.Drawables;
namespace MonoDroid.CustomList
{
public class CustomListAdapter : BaseAdapter
{
Activity context;
public List<Animal> items;
public CustomListAdapter(Activity context) //We need a context to inflate our row view from
: base()
{
this.context = context;
//For demo purposes we hard code some data here
this.items = new List<Animal>() {
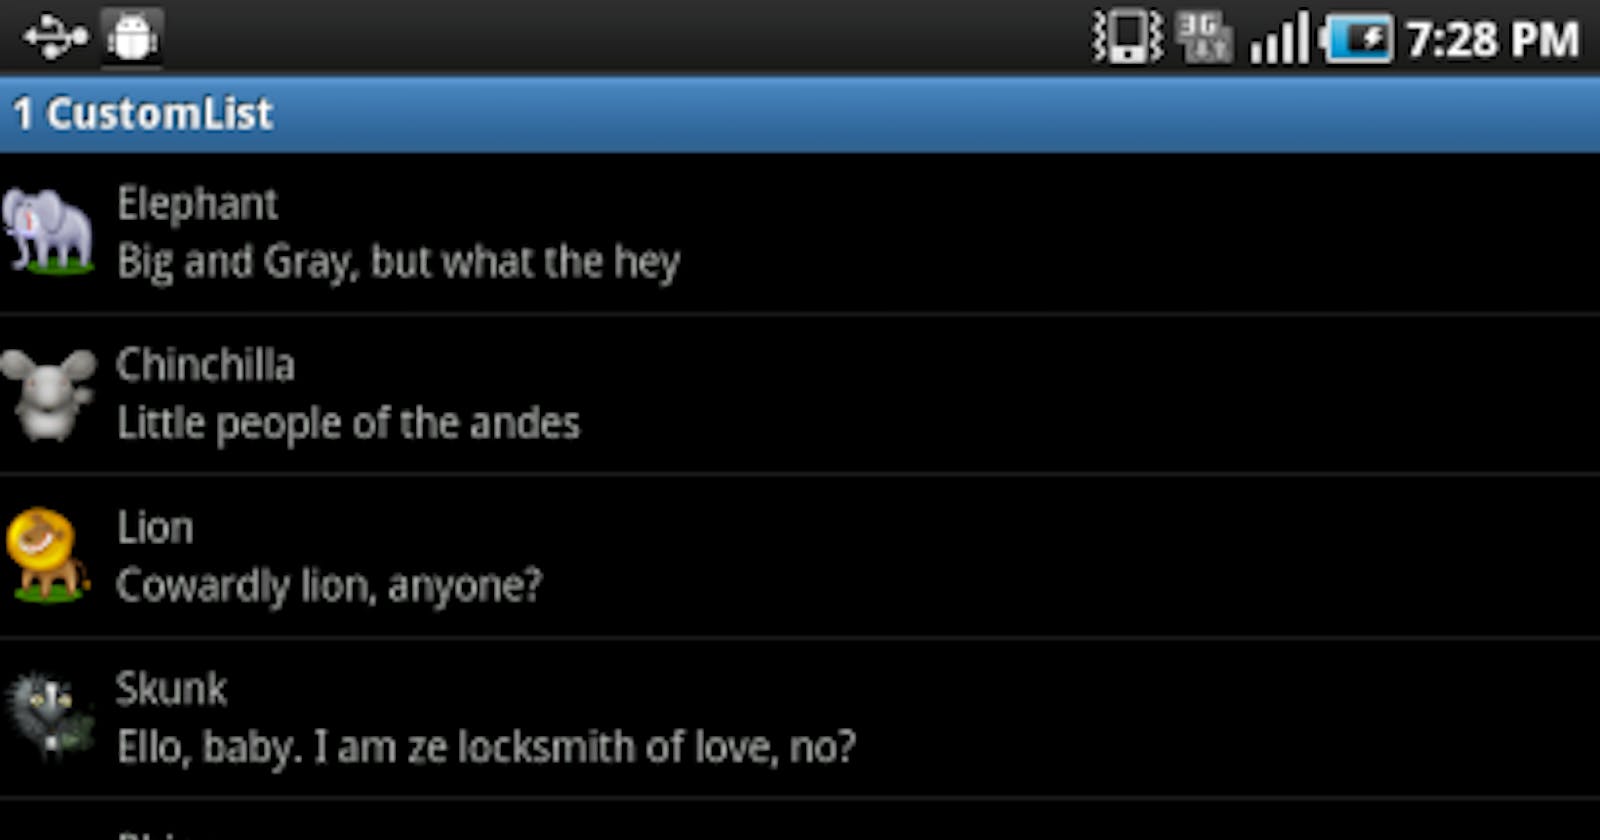
new Animal() { Name = "Elephant", Description = "Big and Gray, but what the hey", Image = Resource.drawable.elephant },
new Animal() { Name = "Chinchilla", Description = "Little people of the andes", Image = Resource.drawable.chinchilla },
new Animal() { Name = "Lion", Description = "Cowardly lion, anyone?", Image = Resource.drawable.lion },
new Animal() { Name = "Skunk", Description = "Ello, baby. I am ze locksmith of love, no?", Image = Resource.drawable.skunk },
new Animal() { Name = "Rhino", Description = "Most live to about 60, pretty old eh?", Image = Resource.drawable.rhino },
new Animal() { Name = "Zebra", Description = "Stripes maybe not so great for hiding", Image = Resource.drawable.zebra },
new Animal() { Name = "Squirrel", Description = "Nuts nuts, where's my nuts?!", Image = Resource.drawable.squirrel },
new Animal() { Name = "Walrus", Description = "I am he as you are he as you are me", Image = Resource.drawable.walrus },
new Animal() { Name = "Giraffe", Description = "Bigger than your ford pinto", Image = Resource.drawable.giraffe },
new Animal() { Name = "Chicken", Description = "I'll take 2 eggs over easy", Image = Resource.drawable.chicken },
new Animal() { Name = "Duck", Description = "He's all quacked up", Image = Resource.drawable.duck },
new Animal() { Name = "Hawk", Description = "He needs to be on a t-shirt", Image = Resource.drawable.hawk },
new Animal() { Name = "Lobster", Description = "We were at the beach...", Image = Resource.drawable.lobster },
new Animal() { Name = "Pig", Description = "Babe, Orson, Piglet, whatever", Image = Resource.drawable.pig },
new Animal() { Name = "Rabbit", Description = "Thumper is the best rabbit name ever", Image = Resource.drawable.rabbit },
new Animal() { Name = "Turtle", Description = "Slow and steady wins the race", Image = Resource.drawable.turtle },
};
}
public override int Count {
get { return items.Count; }
}
public override Java.Lang.Object GetItem(int position)
{
return position;
}
public override long GetItemId(int position)
{
return position;
}
public override View GetView(int position, View convertView, ViewGroup parent)
{
//Get our object for this position
var item = items[position];
//Try to reuse convertView if it's not null, otherwise inflate it from our item layout
// This gives us some performance gains by not always inflating a new view
// This will sound familiar to MonoTouch developers with UITableViewCell.DequeueReusableCell()
var view = (convertView ?? context.LayoutInflater.Inflate( Resource.layout.customlistitem, parent, false)) as LinearLayout;
//Find references to each subview in the list item's view
var imageItem = view.FindViewById(Resource.id.imageItem) as ImageView;
var textTop = view.FindViewById(Resource.id.textTop) as TextView;
var textBottom = view.FindViewById(Resource.id.textBottom) as TextView;
//Assign this item's values to the various subviews
imageItem.SetImageResource(item.Image);
textTop.SetText(item.Name, TextView.BufferType.Normal);
textBottom.SetText(item.Description, TextView.BufferType.Normal);
//Finally return the view
return view;
}
public Animal GetItemAtPosition(int position)
{
return items[position];
}
}
}
Oh, and here’s the Animal class if you’re curious:
namespace MonoDroid.CustomList
{
    public class Animal
    {
        public string Name { get; set; }
        public string Description { get; set; }
        public int Image { get; set; }
    }
}
Now for the sake of the demo, I create my own data inside the adapter, and of course nothing is stopping you from getting that data from a webservice, or somewhere more fashionable. The first thing to note is that I’m requiring an Activity object in the ctor. This really is only used to get the LayoutInflator for the given Activity so that we can inflate our row’s View later on, but it is important to have it. Next thing of interest is the overrides. All we really need to override is the Count property, GetItem method, GetItemId method, and GetView method. The last method (GetItemAtPosition) is my own addition so that I can read out the object for a given position elsewhere in the project (in this case, when a ListView.ItemClicked event is fired).
Count is easy, just return your object list’s count (duh). GetItem and GetItemId I’m still not convinced are necessary, but I override them anyways and just return the position in each case. The only significance I know of so far with these properties is in some ListView events, the item Id is passed as an event arg. However, in these same events, we also get the item’s position, which is why I have the GetItemAtPosition method, so I can retrieve the relevant object for the event. I’d love to hear from anyone who knows more about why I might want to pay more attention to the GetItem and GetItemId methods.
GetView is where the magic happens. Basically, I get the item for the given position first. Next, I determine if the convertView parameter is null or not, and inflate my CustomListItem’s layout into a usable View (LinearLayout to be specific). This is basically a way for us to reuse resources. Anyone familiar with MonoTouch and the Reusable UITableViewCell will feel right at home here. We could inflate the resource every time, but that would waste unnecessary resources. So, best practice here is to always reuse if the convertView is not null. Now then, with my LinearLayout instance, I can locate all of the views within that I want to assign information to, for the given row. As you can see in this case, I have an ImageView, and two TextView’s.
Here is what the layout xml looks like for my custom list item:
<?xml version="1.0" encoding="utf-8"?>
<LinearLayout xmlns:android="http://schemas.android.com/apk/res/android"
  android:id="@+id/widget28" android:layout_width="fill_parent"
  android:layout_height="80px">
    <ImageView android:id="@+id/imageItem"
               android:layout_width="wrap_content"
               android:layout_height="wrap_content"
               android:layout_gravity="center_vertical" />
    <LinearLayout android:id="@+id/linearText"
                  android:layout_width="wrap_content"
                  android:layout_height="fill_parent"
                  android:orientation="vertical"
                  android:layout_marginLeft="10px"
                  android:layout_marginTop="10px">
        <TextView android:id="@+id/textTop"
                  android:layout_width="wrap_content"
                  android:layout_height="wrap_content"
                  android:text="TextView" />
        <TextView android:id="@+id/textBottom"
                  android:layout_width="wrap_content"
                  android:layout_height="wrap_content"
                  android:text="TextView" />
    </LinearLayout>
</LinearLayout>
Once I have found references to these, I can set their text and image. Finally, I can return the LinearLayout View that I’ve been working on for this row. That wasn’t so hard, was it? Last, but not least, we need to actually deal with our Activity that holds the ListView. Up until now we had just created the adapter that our ListView was going to use. Now we need to actually hook an adapta’ up.
Here’s what my Activity code looks like:
using System;
using Android.App;
using Android.Content;
using Android.Runtime;
using Android.Views;
using Android.Widget;
using Android.OS;

namespace MonoDroid.CustomList
{
    [Activity(Label = "1 CustomList", MainLauncher = true)]
    public class CustomList : Activity
    {
        CustomListAdapter listAdapter;

        public CustomList(IntPtr handle) : base(handle) { } protected

        override void OnCreate(Bundle bundle)
        {
            base.OnCreate(bundle);

            //Set the Activity's view to our list layout
            SetContentView(Resource.layout.customlist);

            //Create our adapter
            listAdapter = new CustomListAdapter(this);

            //Find the listview reference
            var listView = FindViewById<ListView>(Resource.id.listView);

            //Hook up our adapter to our ListView
            listView.Adapter = listAdapter;

            //Wire up the click event
            listView.ItemClick += new EventHandler<ItemEventArgs>(listView_ItemClick);
        }

        void listView_ItemClick(object sender, ItemEventArgs e)
        {
            //Get our item from the list adapter
            var item = this.listAdapter.GetItemAtPosition(e.Position);

            //Make a toast with the item name just to show it was clicked
            Toast.MakeText(this, item.Name + " Clicked!", ToastLength.Short).Show();
        }
    }
}
Here’s the layout xml behind this activity:
<?xml version="1.0" encoding="utf-8"?>
<LinearLayout android:id="@+id/widget28"
              android:layout_width="fill_parent"
              android:layout_height="fill_parent"
              android:orientation="vertical"
              xmlns:android="http://schemas.android.com/apk/res/android">
    <ListView android:id="@+id/listView"
              android:layout_width="fill_parent"
              android:layout_height="fill_parent" />
</LinearLayout>
So you can see in my Activity’s OnCreate, I’m calling the base method (important), and then setting the activity’s content view to the layout xml that I showed you above. I’m also creating an instance of the CustomListAdapter I made earlier, and finding a reference to my ListView, so that I can set my ListView’s .Adapter property to the instance of the CustomListAdapter. As a bonus, I register the ItemClick event of my ListView, and in it, retrieve the item for the given position, from my CustomListAdapter, using the method I added to the adapter (GetItemPositionAt). I then display a Toast with the name of the Animal clicked.
Hopefully this little tutorial enlightens you on how to make some fancy lists (not those boring default ones). I’ve also made the source code of the entire project available: